文章目录#
一. 安装 Nexus#
1. 下载并启动#
首先下载 Nexus,地址为 Download。以 Ubuntu 为例下载命令如下:
1
| wget http://download.sonatype.com/nexus/3/nexus-3.28.1-01-unix.tar.gz
|
然后解压到 /opt 目录,会有两个目录,分别是
nexus-3.28.1-01:应用目录,包含 Nexus 所需的文件,比如启动脚本,依赖 jar 包等。sonatype-work:工作目录,包含 Nexus 生成的配置文件、日志文件、仓库文件等。
1
2
3
4
5
| $ sudo tar -C /opt -zxf nexus-3.28.1-01-unix.tar.gz
$ ls
total 16K
nexus-3.28.1-01
sonatype-work
|
2. 修改配置#
Nexus 最常见的配置修改有两个地方:JVM 配置和 应用配置。
首先是 JVM 相关的配置,配置文件位于 /opt/nexus-3.28.1-01/bin/nexus.vmoptions
 1
 2
 3
 4
 5
 6
 7
 8
 9
10
11
| $ cat nexus.vmoptions
-Xms2703m
-Xmx2703m
-XX:MaxDirectMemorySize=2703m
-XX:+UnlockDiagnosticVMOptions
-XX:+LogVMOutput
-XX:LogFile=../sonatype-work/nexus3/log/jvm.log
-XX:-OmitStackTraceInFastThrow
-Djava.net.preferIPv4Stack=true
...
|
Nexus 运行相关的配置文件位于 /opt/sonatype-work/nexus3/etc/nexus.properties,与应用运行相关的,比如 HTTP 端口可以在这里配置。
 1
 2
 3
 4
 5
 6
 7
 8
 9
10
11
12
13
14
| $ cat nexus.properties
# Jetty section
# 设置 HTTP 端口
# application-port=8082
# application-host=0.0.0.0
# nexus-args=${jetty.etc}/jetty.xml,${jetty.etc}/jetty-http.xml,${jetty.etc}/jetty-requestlog.xml
# nexus-context-path=/
# Nexus section
# nexus-edition=nexus-pro-edition
# nexus-features=\
# nexus-pro-feature
# nexus.hazelcast.discovery.isEnabled=true
|
3.纳入 systemd 管理#
最后为了方便应用的管理,我们将 Nexus 纳入 systemd 管理。
- 创建
/etc/systemd/system/nexus.service 文件
 1
 2
 3
 4
 5
 6
 7
 8
 9
10
11
12
13
14
15
| [Unit]
Description=nexus service
After=network.target
[Service]
Type=forking
LimitNOFILE=65536
ExecStart=/opt/nexus-3.28.1-01/bin/nexus start
ExecStop=/opt/nexus-3.28.1-01/bin/nexus stop
User=ubuntu
Restart=on-abort
TimeoutSec=600
[Install]
WantedBy=multi-user.target
|
1
2
3
| sudo systemctl daemon-reload
sudo systemctl enable nexus.service
sudo systemctl start nexus.service
|
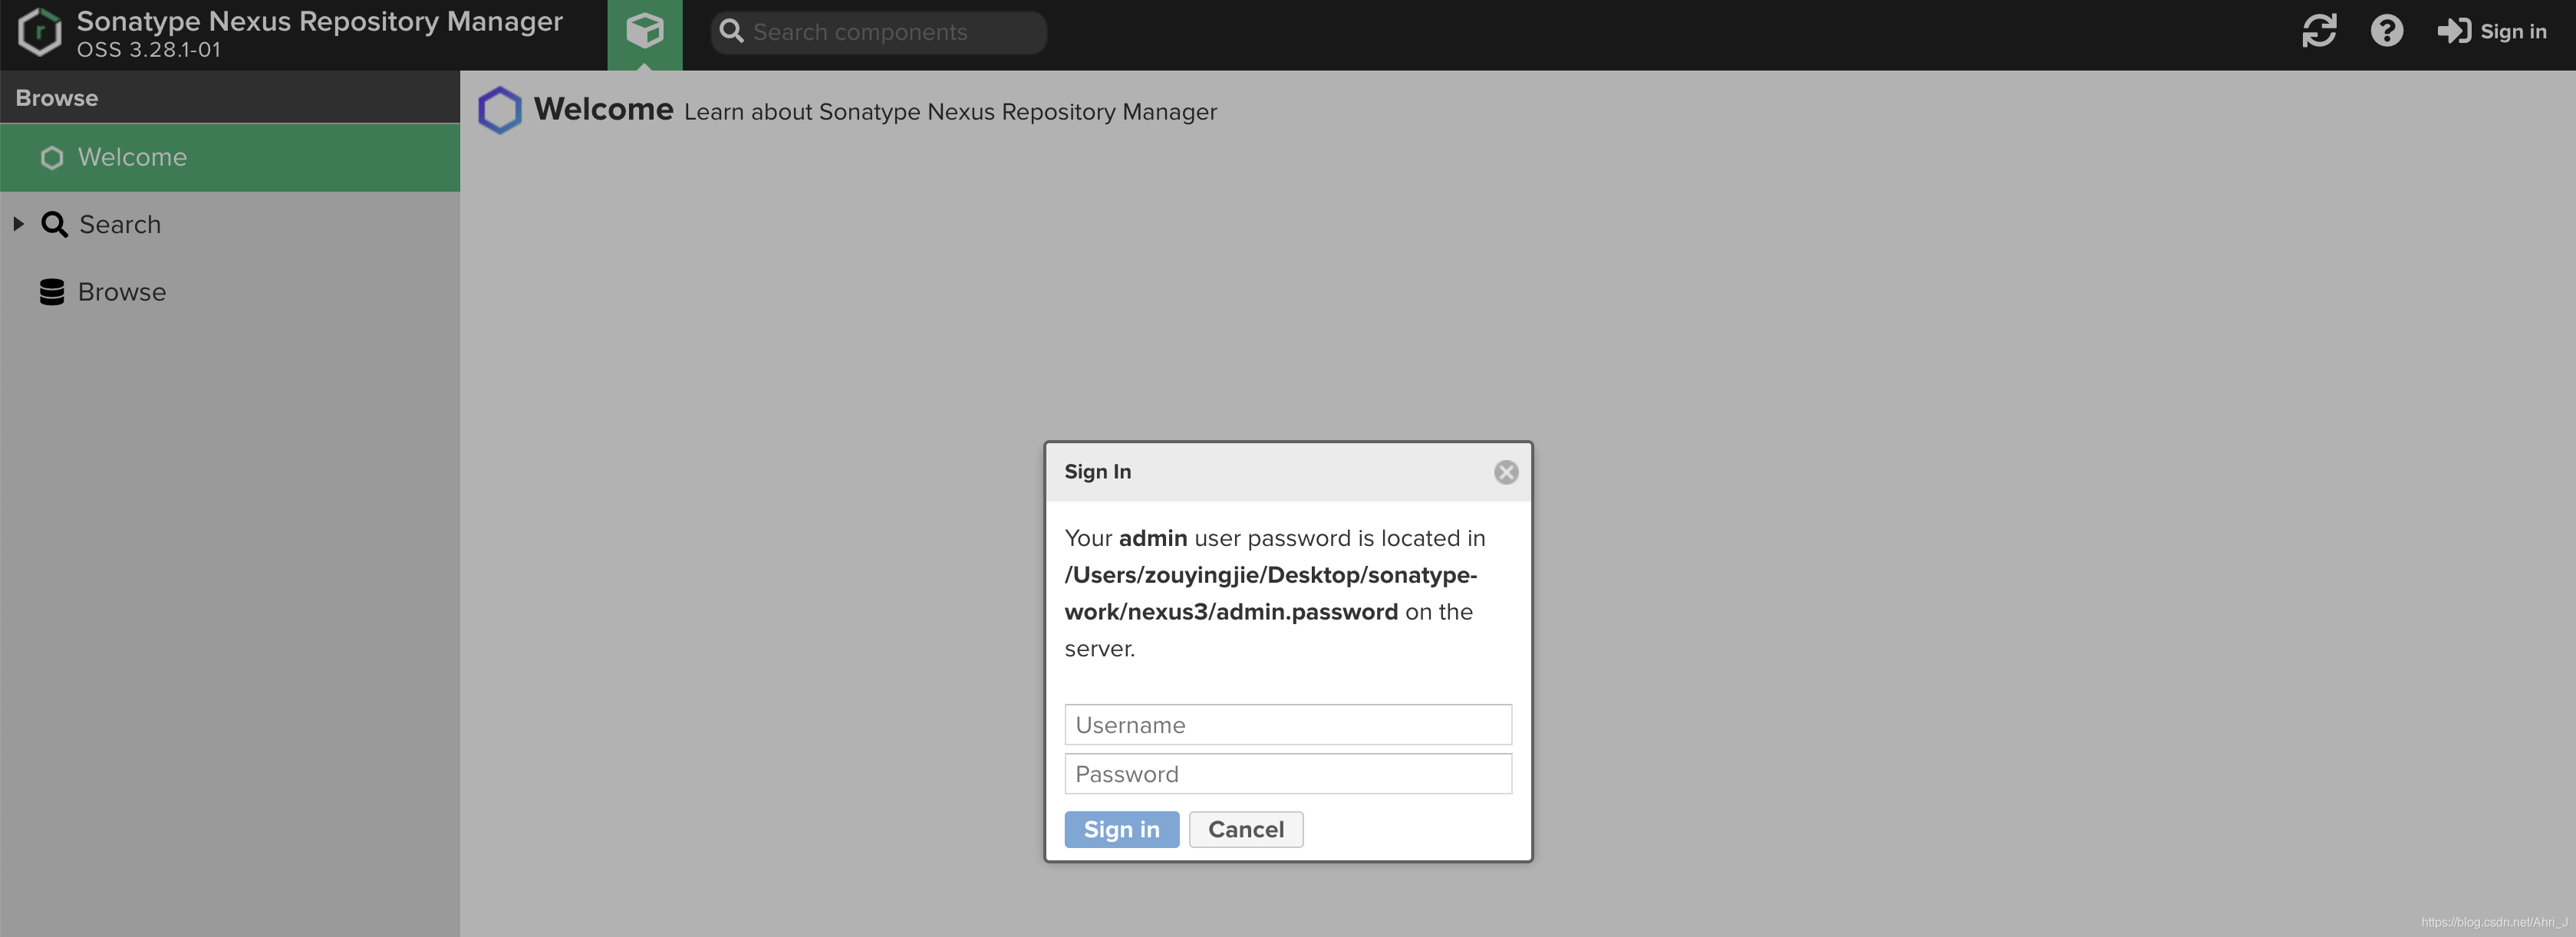
应用启动后访问,提示我们填写用户名密码,初始用户名为 admin,初始密码位于工作目录 sonatype-work/nexus3/admin.password 文件,填写登陆后需要修改密码,完成后 Nexus 就跑起来啦。
二. Nexus Maven 仓库简介#
进入 Nexus 后台查看 Maven 仓库,默认的 maven 仓库有下面几个:

这里简单介绍下,Nexus 中 Maven 仓库有四种类型:
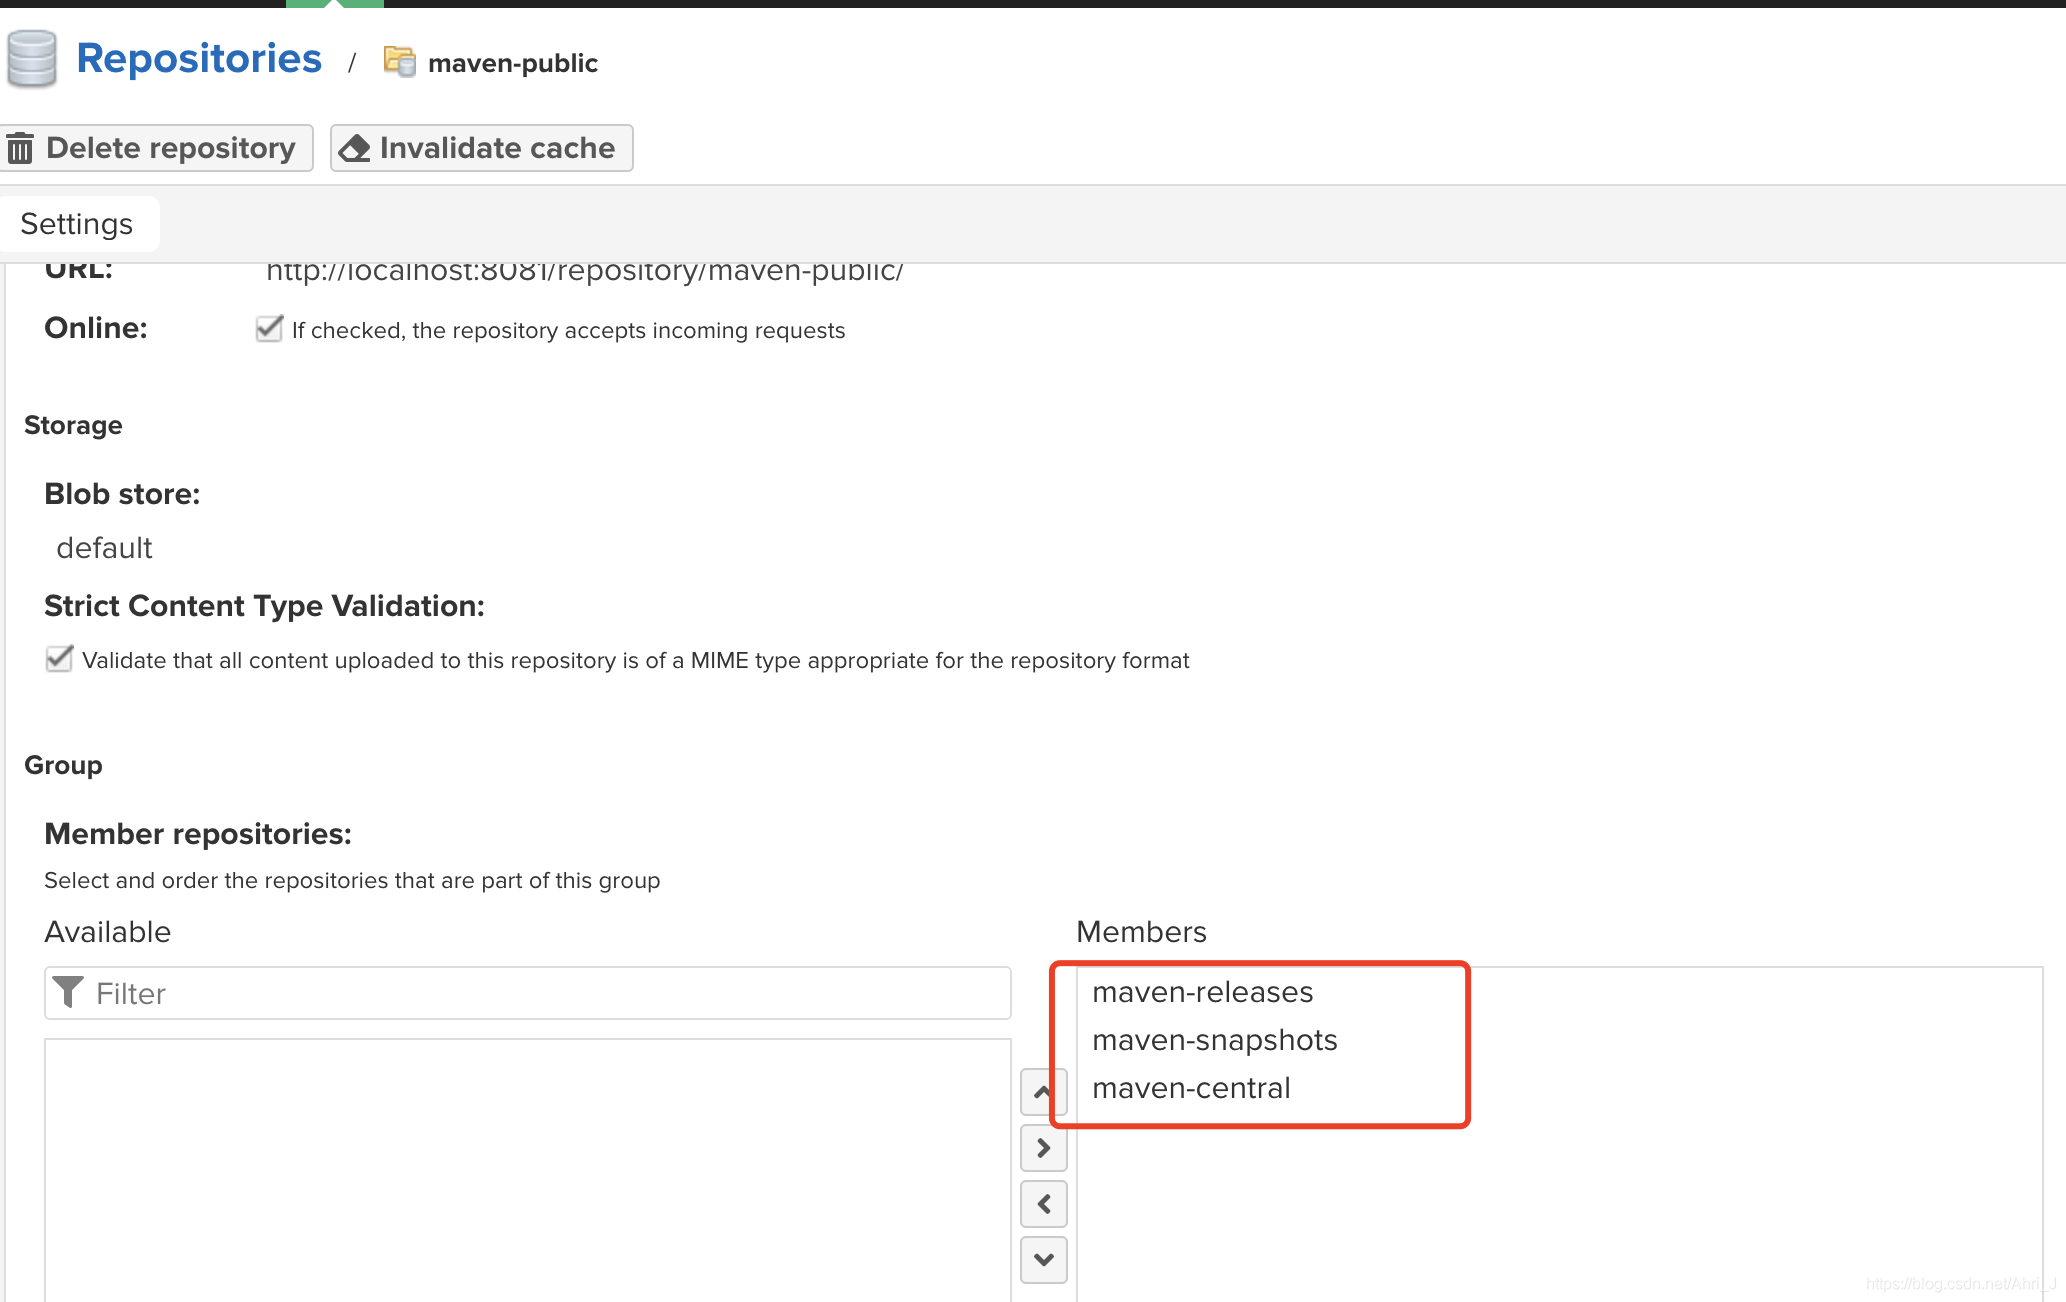
proxy(代理):顾名思义就是某个仓库的代理,图中 maven-central 仓库就是对中央仓库的代理。hosted(宿主):所谓宿主仓库就是本地仓库,用来部署组织内部的版本构件,也可以用用来存放无法从中央仓库获取的第三方库的构件。图中的 maven-releases 和 maven-snapshots 均为本地宿主仓库。group(仓库组):就是一组仓库的集合,可以包含宿主仓库和代理仓库,图中的 maven-public 就是一个用户组,包含了三个仓库,如图。
仓库还有一个 Policy(策略) 属性,用来表示该仓库是 Release(发布) 版本仓库还是 Snapshot(快照) 版本仓库,图中的 maven-releases 和 maven-snapshots 就分别代表不同策略的本地仓库。
对于上面几种类型的仓库,关系如图
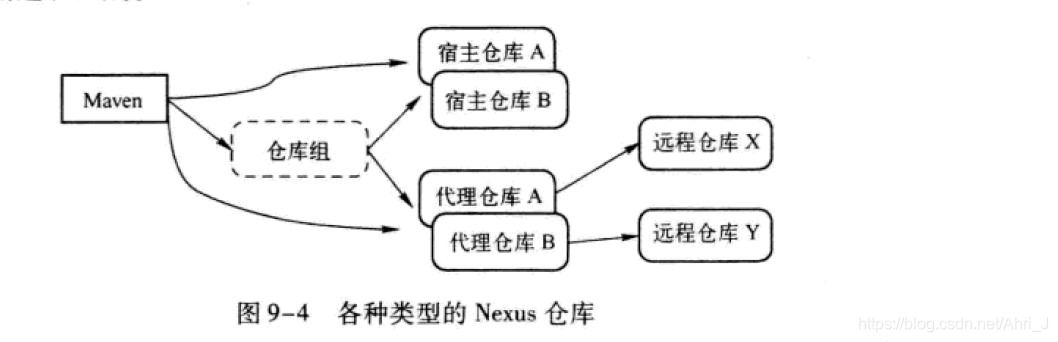 Maven 可以直接从宿主仓库下载构件,也可以从代理仓库下载构件,而代理仓库会间接从远程仓库下载构件。仓库组没有实际内容,其会将 maven 的下载请求转到其包含的宿主仓库或者代理仓库中下载。
三. 配置从 Nexus 私服拉取构件#
现在私服搭建好了该如何让我们的项目从私服拉取构件呢?这里有三种方式。
1. 项目中配置#
最基本的一种方式就是在我们项目 pom.xml 文件中指定仓库地址,如下
 1
 2
 3
 4
 5
 6
 7
 8
 9
10
11
| <project>
...
<repositories>
<repository>
<id>nexus-release</id>
<name>nexus-release</name>
<url>http://localhost:8081/repository/maven-releases/</url>
</repository>
</repositories>
...
</project>
|
这样我们项目构建时就会从我们的 Maven 私服 maven-releases 下载了构件了。
2. settings.xml 统一配置#
第一种方式仅对单个项目生效,如果我们想让本机的所有项目都从自己的私服中下载构件,则需要修改 ~/.m2/settings.xml 文件。 settings.xml 不支持直接配置 repositories 和 repository,但提供了 profile 机制实现。 如下
 1
 2
 3
 4
 5
 6
 7
 8
 9
10
11
12
13
14
15
16
17
18
19
20
21
22
| <settings>
...
<profiles>
...
<profile>
<id>myprofile</id>
<repositories>
<repository>
<id>nexus-release</id>
<name>nexus-release</name>
<url>http://localhost:8081/repository/maven-releases/</url>
</repository>
</repositories>
</profile>
...
</profiles>
<activeProfiles>
<activeProfile>nexus-release</activeProfile>
</activeProfiles>
...
</settings>
|
配置完后,本机所有的 maven 项目构建时都会从 Maven 私服的 maven-releases 仓库下载构建了。
3. 配置镜像#
第二种方式配置完成后,执行构建时我们会发现项目会同时从 Maven 私服和中央仓库中下载构件,如果我们希望所有的下载都通过我们的 Nexus 私服呢?此时需要用到 Maven 的镜像配置。
所谓镜像,如果仓库 X 可以提供仓库 Y 提供的所有构件,那么仓库 X 就是仓库 Y 的镜像。即任何可以从 Y 仓库获取的构件都可以从 X 仓库获取。比如因为地理位置因素,我们从中央仓库下载构建往往比较慢,我们可以通过镜像用自己的私服来代替中央仓库。
这里需要修改 ~/.m2/settings.xml 文件,配置如下:
 1
 2
 3
 4
 5
 6
 7
 8
 9
10
11
12
13
14
| <settings>
...
<mirrors>
<mirror>
<id>nexus-mirror</id>
<name>nexus-mirror</name>
<!-- 代替的仓库 -->
<url>http://localhost:8081/repository/maven-public/</url>
<!-- central 表示中央仓库配置 -->
<mirrorOf>central</mirrorOf>
</mirror>
</mirrors>
...
</settings>
|
上面的配置表示所有向中央仓库的请求都会被转到 Nexus 私服中的 maven-public 仓库组中,仓库组中的宿主仓库是本地下载,而代理仓库也有了缓存,因此其构建速度会大大加快。
四. 部署库到 Nexus 私服#
最后,我们有了 Nexus 私服,内部自己开发的构件就可以部署到私服中让其他项目使用了,可以通过下面配置实现。
这里我们把要部署到的仓库加进去,日常开发的快照版本构建可以直接发布到策略为 snapshots 的 maven-snapshots 仓库中,项目正式发布的构建则应该部署到策略为 release 的 maven-release 仓库中,配置如下:
 1
 2
 3
 4
 5
 6
 7
 8
 9
10
11
12
13
14
15
| <project>
...
<distributionManagement>
<repository>
<!-- 仓库 ID -->
<id>nexus-releases</id>
<url>http://localhost:8081/repository/maven-releases/</url>
</repository>
<snapshotRepository>
<id>nexus-snapshots</id>
<url>http://localhost:8081/repository/maven-snapshots/</url>
</snapshotRepository>
</distributionManagement>
...
</project>
|
Maven 私服是匿名只读的,如果我们要往里部署构建,需要验证信息。我们需要在 ~/.m2/settings.xml 文件中设置 server 信息如下:
 1
 2
 3
 4
 5
 6
 7
 8
 9
10
11
12
13
14
15
16
17
18
19
20
21
| <settings xmlns="http://maven.apache.org/SETTINGS/1.1.0"
xmlns:xsi="http://www.w3.org/2001/XMLSchema-instance"
xsi:schemaLocation="http://maven.apache.org/SETTINGS/1.1.0 http://maven.apache.org/xsd/settings-1.1.0.xsd">
<servers>
<server>
<!-- 仓库 ID,必须和 pom 中一致-->
<id>nexus-releases</id>
<!-- 设置用户名密码 -->
<username>admin</username>
<password>aaaaaa</password>
</server>
<server>
<!-- 仓库 ID,必须和 pom 中一致-->
<id>nexus-snapshots</id>
<!-- 设置用户名密码 -->
<username>admin</username>
<password>aaaaaa</password>
</server>
</servers>
</settings>
|
配置完成后执行命令 mvn -DskipTests=true clean deploy 即可。
下面以为自己新建的一个 maven 项目为例
1. pom.xml 文件 设置
 1
 2
 3
 4
 5
 6
 7
 8
 9
10
11
12
13
14
15
16
17
18
19
20
21
22
23
24
25
26
27
28
29
30
31
32
33
34
35
36
37
38
39
40
41
42
43
44
45
46
47
48
49
50
51
52
53
54
55
56
57
58
59
60
61
| <?xml version="1.0" encoding="UTF-8"?>
<project xmlns="http://maven.apache.org/POM/4.0.0" xmlns:xsi="http://www.w3.org/2001/XMLSchema-instance"
xsi:schemaLocation="http://maven.apache.org/POM/4.0.0 https://maven.apache.org/xsd/maven-4.0.0.xsd">
<modelVersion>4.0.0</modelVersion>
<parent>
<groupId>org.springframework.boot</groupId>
<artifactId>spring-boot-starter-parent</artifactId>
<version>2.3.5.RELEASE</version>
<relativePath/> <!-- lookup parent from repository -->
</parent>
<groupId>com.nexus</groupId>
<artifactId>nexus-maven-deploy</artifactId>
<version>0.0.1-SNAPSHOT</version>
<name>nexus-maven-deploy</name>
<description>Demo project for Spring Boot</description>
<properties>
<java.version>1.8</java.version>
</properties>
<distributionManagement>
<repository>
<!-- 仓库 ID -->
<id>nexus-releases</id>
<url>http://localhost:8081/repository/maven-releases/</url>
</repository>
<snapshotRepository>
<id>nexus-snapshots</id>
<url>http://localhost:8081/repository/maven-snapshots/</url>
</snapshotRepository>
</distributionManagement>
<dependencies>
<dependency>
<groupId>org.springframework.boot</groupId>
<artifactId>spring-boot-starter-web</artifactId>
</dependency>
<dependency>
<groupId>org.springframework.boot</groupId>
<artifactId>spring-boot-starter-test</artifactId>
<scope>test</scope>
<exclusions>
<exclusion>
<groupId>org.junit.vintage</groupId>
<artifactId>junit-vintage-engine</artifactId>
</exclusion>
</exclusions>
</dependency>
</dependencies>
<build>
<plugins>
<plugin>
<groupId>org.springframework.boot</groupId>
<artifactId>spring-boot-maven-plugin</artifactId>
</plugin>
</plugins>
</build>
</project>
|
2. settings.xml 文件配置
 1
 2
 3
 4
 5
 6
 7
 8
 9
10
11
12
13
14
15
16
17
18
| <settings xmlns="http://maven.apache.org/SETTINGS/1.1.0"
xmlns:xsi="http://www.w3.org/2001/XMLSchema-instance"
xsi:schemaLocation="http://maven.apache.org/SETTINGS/1.1.0 http://maven.apache.org/xsd/settings-1.1.0.xsd">
<servers>
<server>
<id>nexus-releases</id>
<username>admin</username>
<password>aaaaa</password>
</server>
<server>
<id>nexus-snapshots</id>
<username>admin</username>
<password>aaaaa</password>
</server>
</servers>
</settings>
|
3. 执行部署命令
 1
 2
 3
 4
 5
 6
 7
 8
 9
10
11
12
13
14
15
16
17
18
19
20
21
22
23
24
25
26
27
28
29
30
31
32
33
34
35
36
37
38
39
40
41
42
43
44
45
46
47
48
49
50
51
52
53
54
55
56
57
| ➜ nexus-maven-deploy mvn -DskipTests=true clean deploy
[INFO] Scanning for projects...
[INFO]
[INFO] --------------------< com.nexus:nexus-maven-deploy >--------------------
[INFO] Building nexus-maven-deploy 0.0.1-SNAPSHOT
[INFO] --------------------------------[ jar ]---------------------------------
[INFO]
[INFO] --- maven-clean-plugin:3.1.0:clean (default-clean) @ nexus-maven-deploy ---
[INFO] Deleting /Users/zouyingjie/study/Java/nexus-maven-deploy/target
[INFO]
[INFO] --- maven-resources-plugin:3.1.0:resources (default-resources) @ nexus-maven-deploy ---
[INFO] Using 'UTF-8' encoding to copy filtered resources.
[INFO] Copying 1 resource
[INFO] Copying 0 resource
[INFO]
[INFO] --- maven-compiler-plugin:3.8.1:compile (default-compile) @ nexus-maven-deploy ---
[INFO] Changes detected - recompiling the module!
[INFO] Compiling 1 source file to /Users/zouyingjie/study/Java/nexus-maven-deploy/target/classes
[INFO]
[INFO] --- maven-resources-plugin:3.1.0:testResources (default-testResources) @ nexus-maven-deploy ---
[INFO] Using 'UTF-8' encoding to copy filtered resources.
[INFO] skip non existing resourceDirectory /Users/zouyingjie/study/Java/nexus-maven-deploy/src/test/resources
[INFO]
[INFO] --- maven-compiler-plugin:3.8.1:testCompile (default-testCompile) @ nexus-maven-deploy ---
[INFO] Changes detected - recompiling the module!
[INFO] Compiling 1 source file to /Users/zouyingjie/study/Java/nexus-maven-deploy/target/test-classes
[INFO]
[INFO] --- maven-surefire-plugin:2.22.2:test (default-test) @ nexus-maven-deploy ---
[INFO] Tests are skipped.
[INFO]
[INFO] --- maven-jar-plugin:3.2.0:jar (default-jar) @ nexus-maven-deploy ---
[INFO] Building jar: /Users/zouyingjie/study/Java/nexus-maven-deploy/target/nexus-maven-deploy-0.0.1-SNAPSHOT.jar
[INFO]
[INFO] --- spring-boot-maven-plugin:2.3.5.RELEASE:repackage (repackage) @ nexus-maven-deploy ---
[INFO] Replacing main artifact with repackaged archive
[INFO]
[INFO] --- maven-install-plugin:2.5.2:install (default-install) @ nexus-maven-deploy ---
[INFO] Installing /Users/zouyingjie/study/Java/nexus-maven-deploy/target/nexus-maven-deploy-0.0.1-SNAPSHOT.jar to /Users/zouyingjie/.m2/repository/com/nexus/nexus-maven-deploy/0.0.1-SNAPSHOT/nexus-maven-deploy-0.0.1-SNAPSHOT.jar
[INFO] Installing /Users/zouyingjie/study/Java/nexus-maven-deploy/pom.xml to /Users/zouyingjie/.m2/repository/com/nexus/nexus-maven-deploy/0.0.1-SNAPSHOT/nexus-maven-deploy-0.0.1-SNAPSHOT.pom
[INFO]
[INFO] --- maven-deploy-plugin:2.8.2:deploy (default-deploy) @ nexus-maven-deploy ---
Downloading from nexus-snapshots: http://localhost:8081/repository/maven-snapshots/com/nexus/nexus-maven-deploy/0.0.1-SNAPSHOT/maven-metadata.xml
Uploading to nexus-snapshots: http://localhost:8081/repository/maven-snapshots/com/nexus/nexus-maven-deploy/0.0.1-SNAPSHOT/nexus-maven-deploy-0.0.1-20201111.085012-1.jar
Uploaded to nexus-snapshots: http://localhost:8081/repository/maven-snapshots/com/nexus/nexus-maven-deploy/0.0.1-SNAPSHOT/nexus-maven-deploy-0.0.1-20201111.085012-1.jar (17 MB at 27 MB/s)
Uploading to nexus-snapshots: http://localhost:8081/repository/maven-snapshots/com/nexus/nexus-maven-deploy/0.0.1-SNAPSHOT/nexus-maven-deploy-0.0.1-20201111.085012-1.pom
Uploaded to nexus-snapshots: http://localhost:8081/repository/maven-snapshots/com/nexus/nexus-maven-deploy/0.0.1-SNAPSHOT/nexus-maven-deploy-0.0.1-20201111.085012-1.pom (2.1 kB at 15 kB/s)
Downloading from nexus-snapshots: http://localhost:8081/repository/maven-snapshots/com/nexus/nexus-maven-deploy/maven-metadata.xml
Uploading to nexus-snapshots: http://localhost:8081/repository/maven-snapshots/com/nexus/nexus-maven-deploy/0.0.1-SNAPSHOT/maven-metadata.xml
Uploaded to nexus-snapshots: http://localhost:8081/repository/maven-snapshots/com/nexus/nexus-maven-deploy/0.0.1-SNAPSHOT/maven-metadata.xml (777 B at 8.9 kB/s)
Uploading to nexus-snapshots: http://localhost:8081/repository/maven-snapshots/com/nexus/nexus-maven-deploy/maven-metadata.xml
Uploaded to nexus-snapshots: http://localhost:8081/repository/maven-snapshots/com/nexus/nexus-maven-deploy/maven-metadata.xml (287 B at 5.2 kB/s)
[INFO] ------------------------------------------------------------------------
[INFO] BUILD SUCCESS
[INFO] ------------------------------------------------------------------------
[INFO] Total time: 3.928 s
[INFO] Finished at: 2020-11-11T16:50:13+08:00
[INFO] ------------------------------------------------------------------------
|
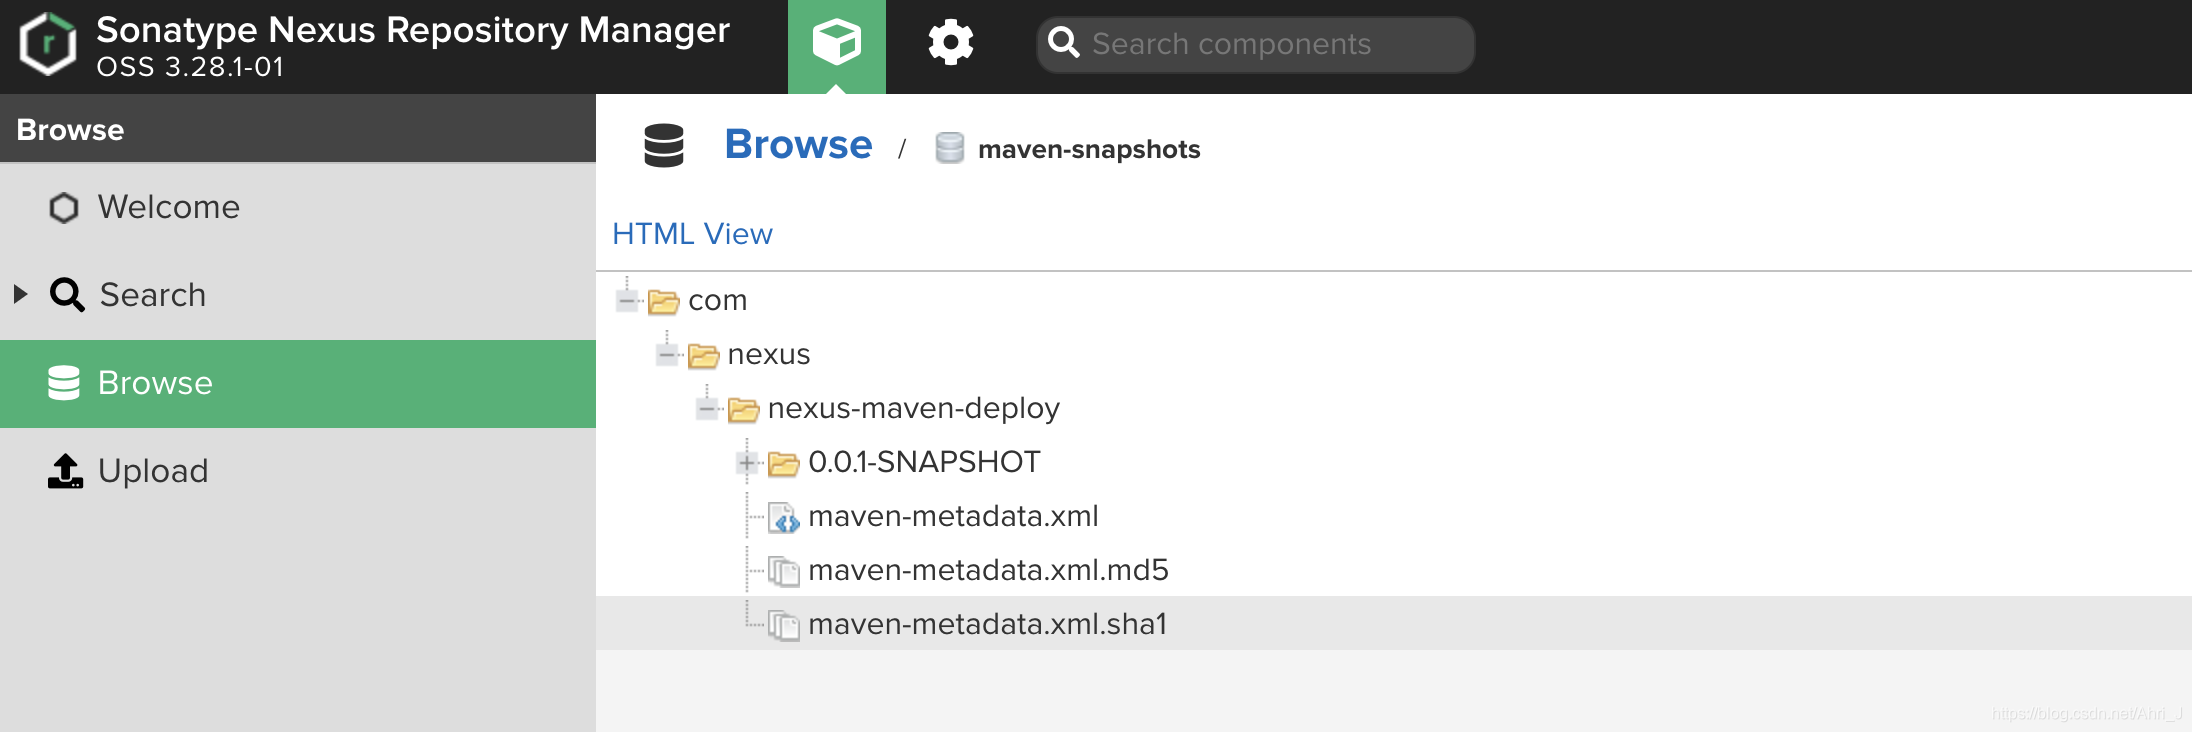
部署完成后查看私服的 maven-snapshots 仓库,可以看到我们的项目已经部署进来了。
五. Nexus 作为 Docker 仓库#
1. 创建仓库#
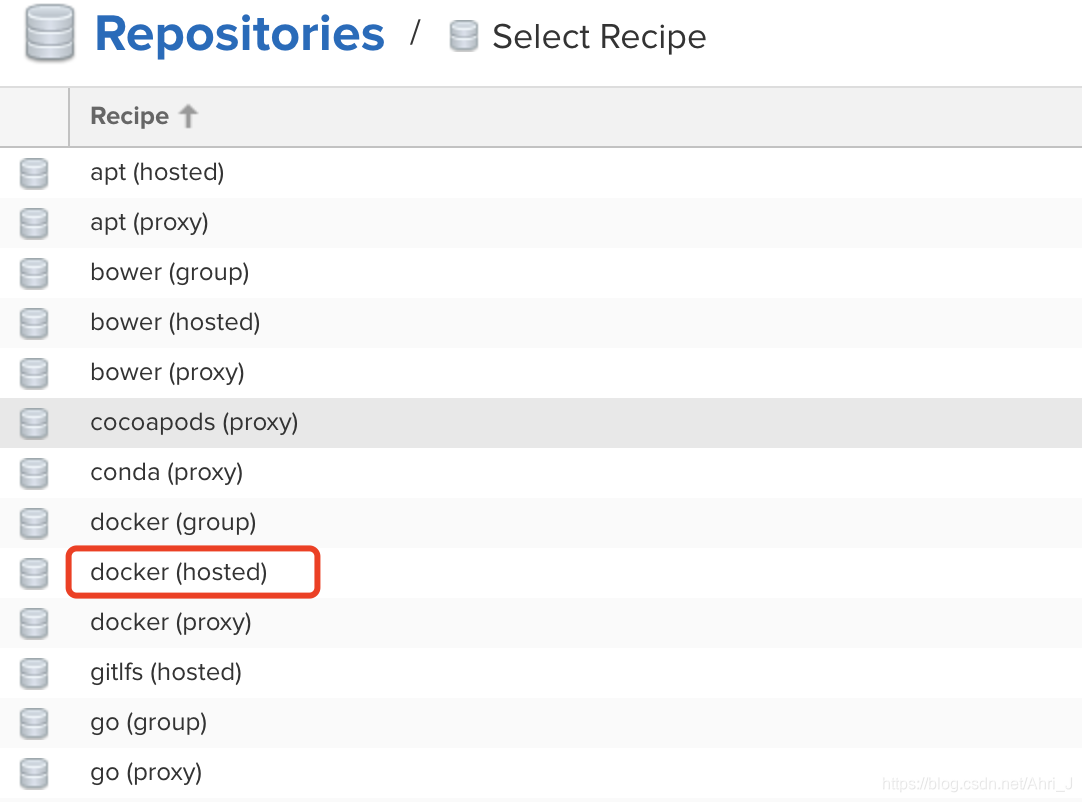
首先我们创建仓库,如图选择 docker(hosted) 类型创建。
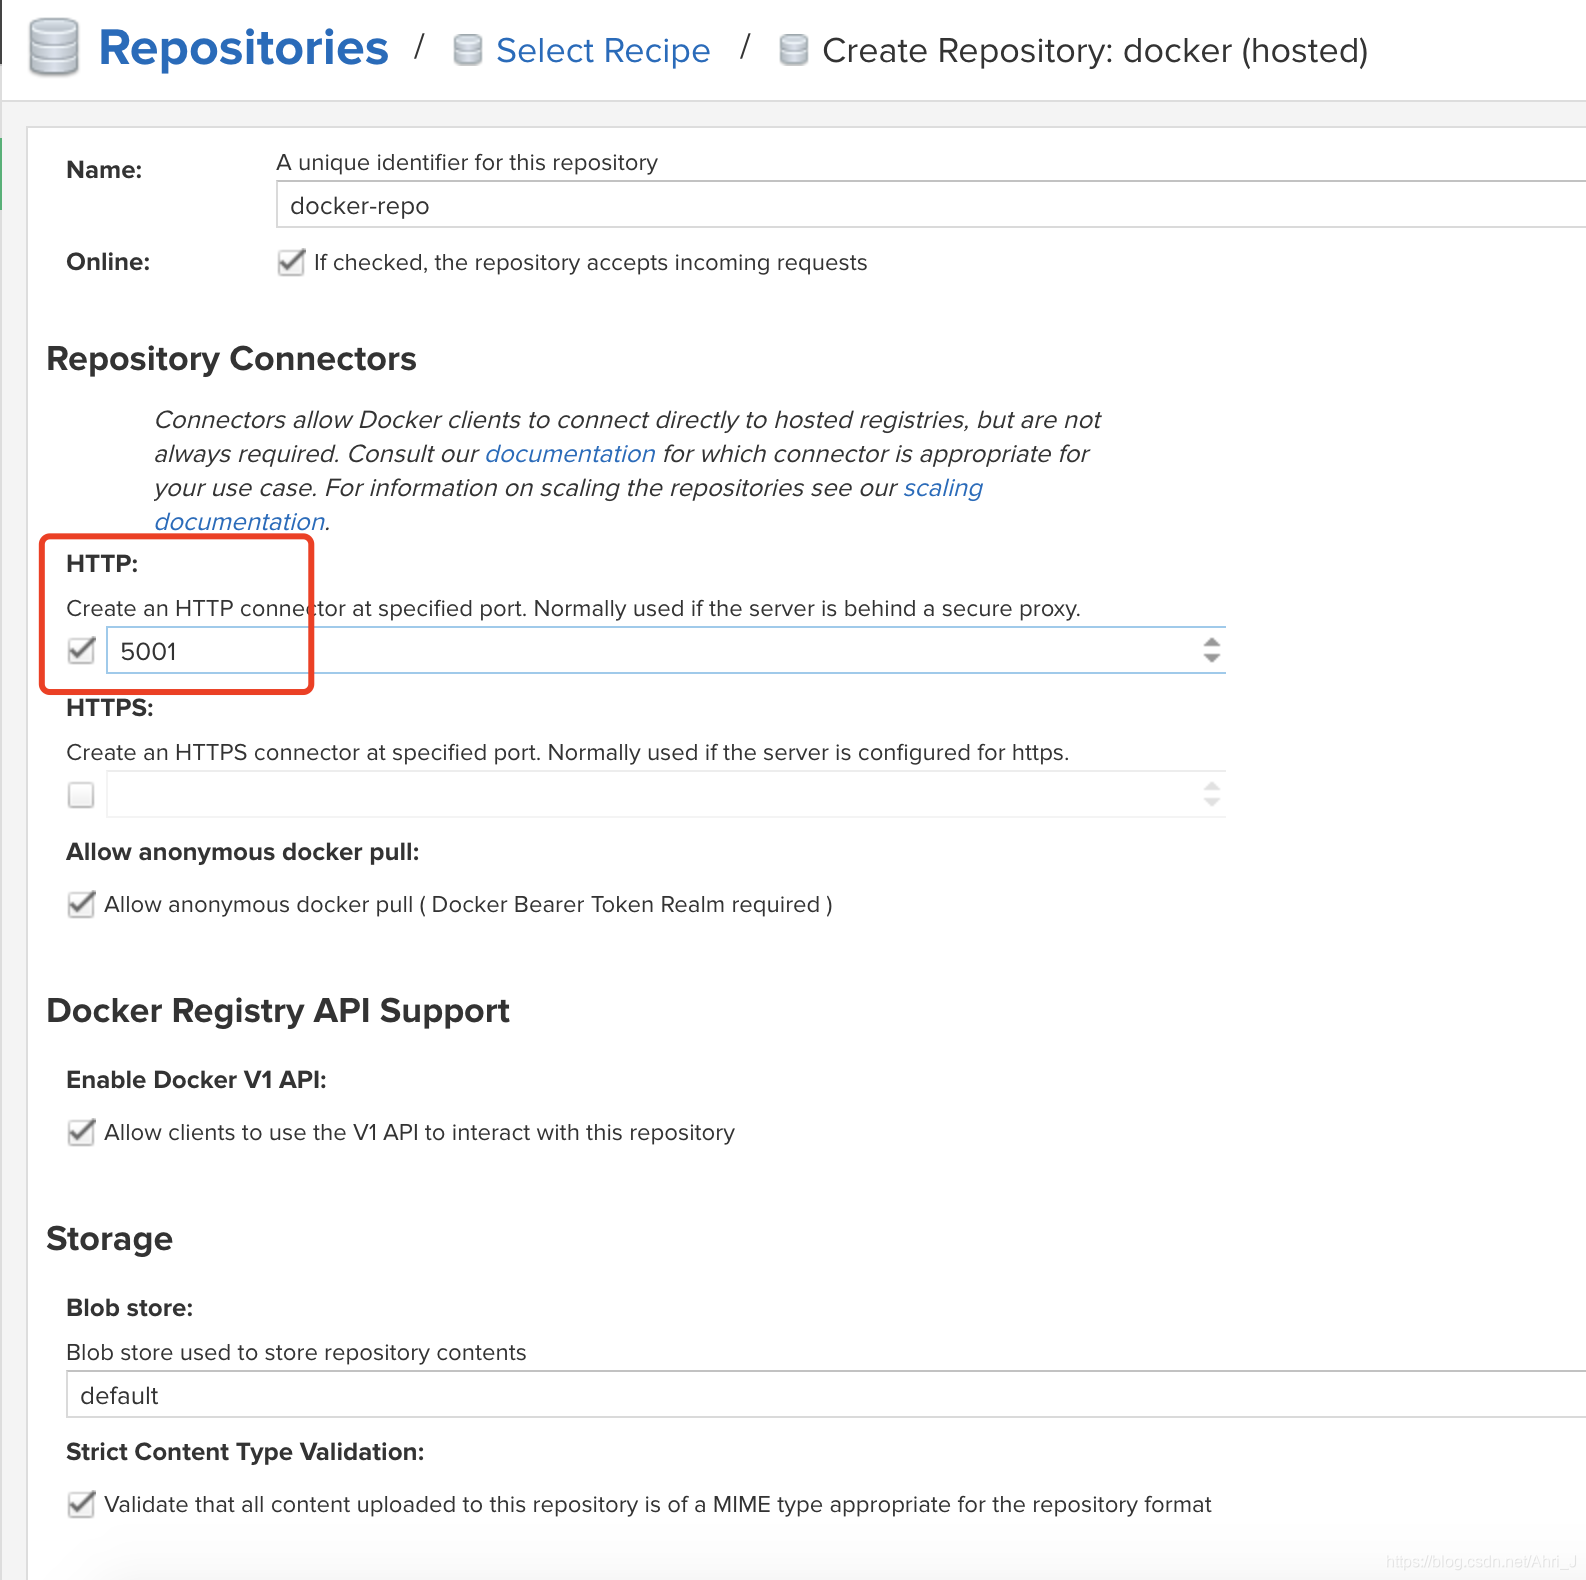
 仓库设置如下,这里我配置了 5001 端口。
2. 修改权限配置#
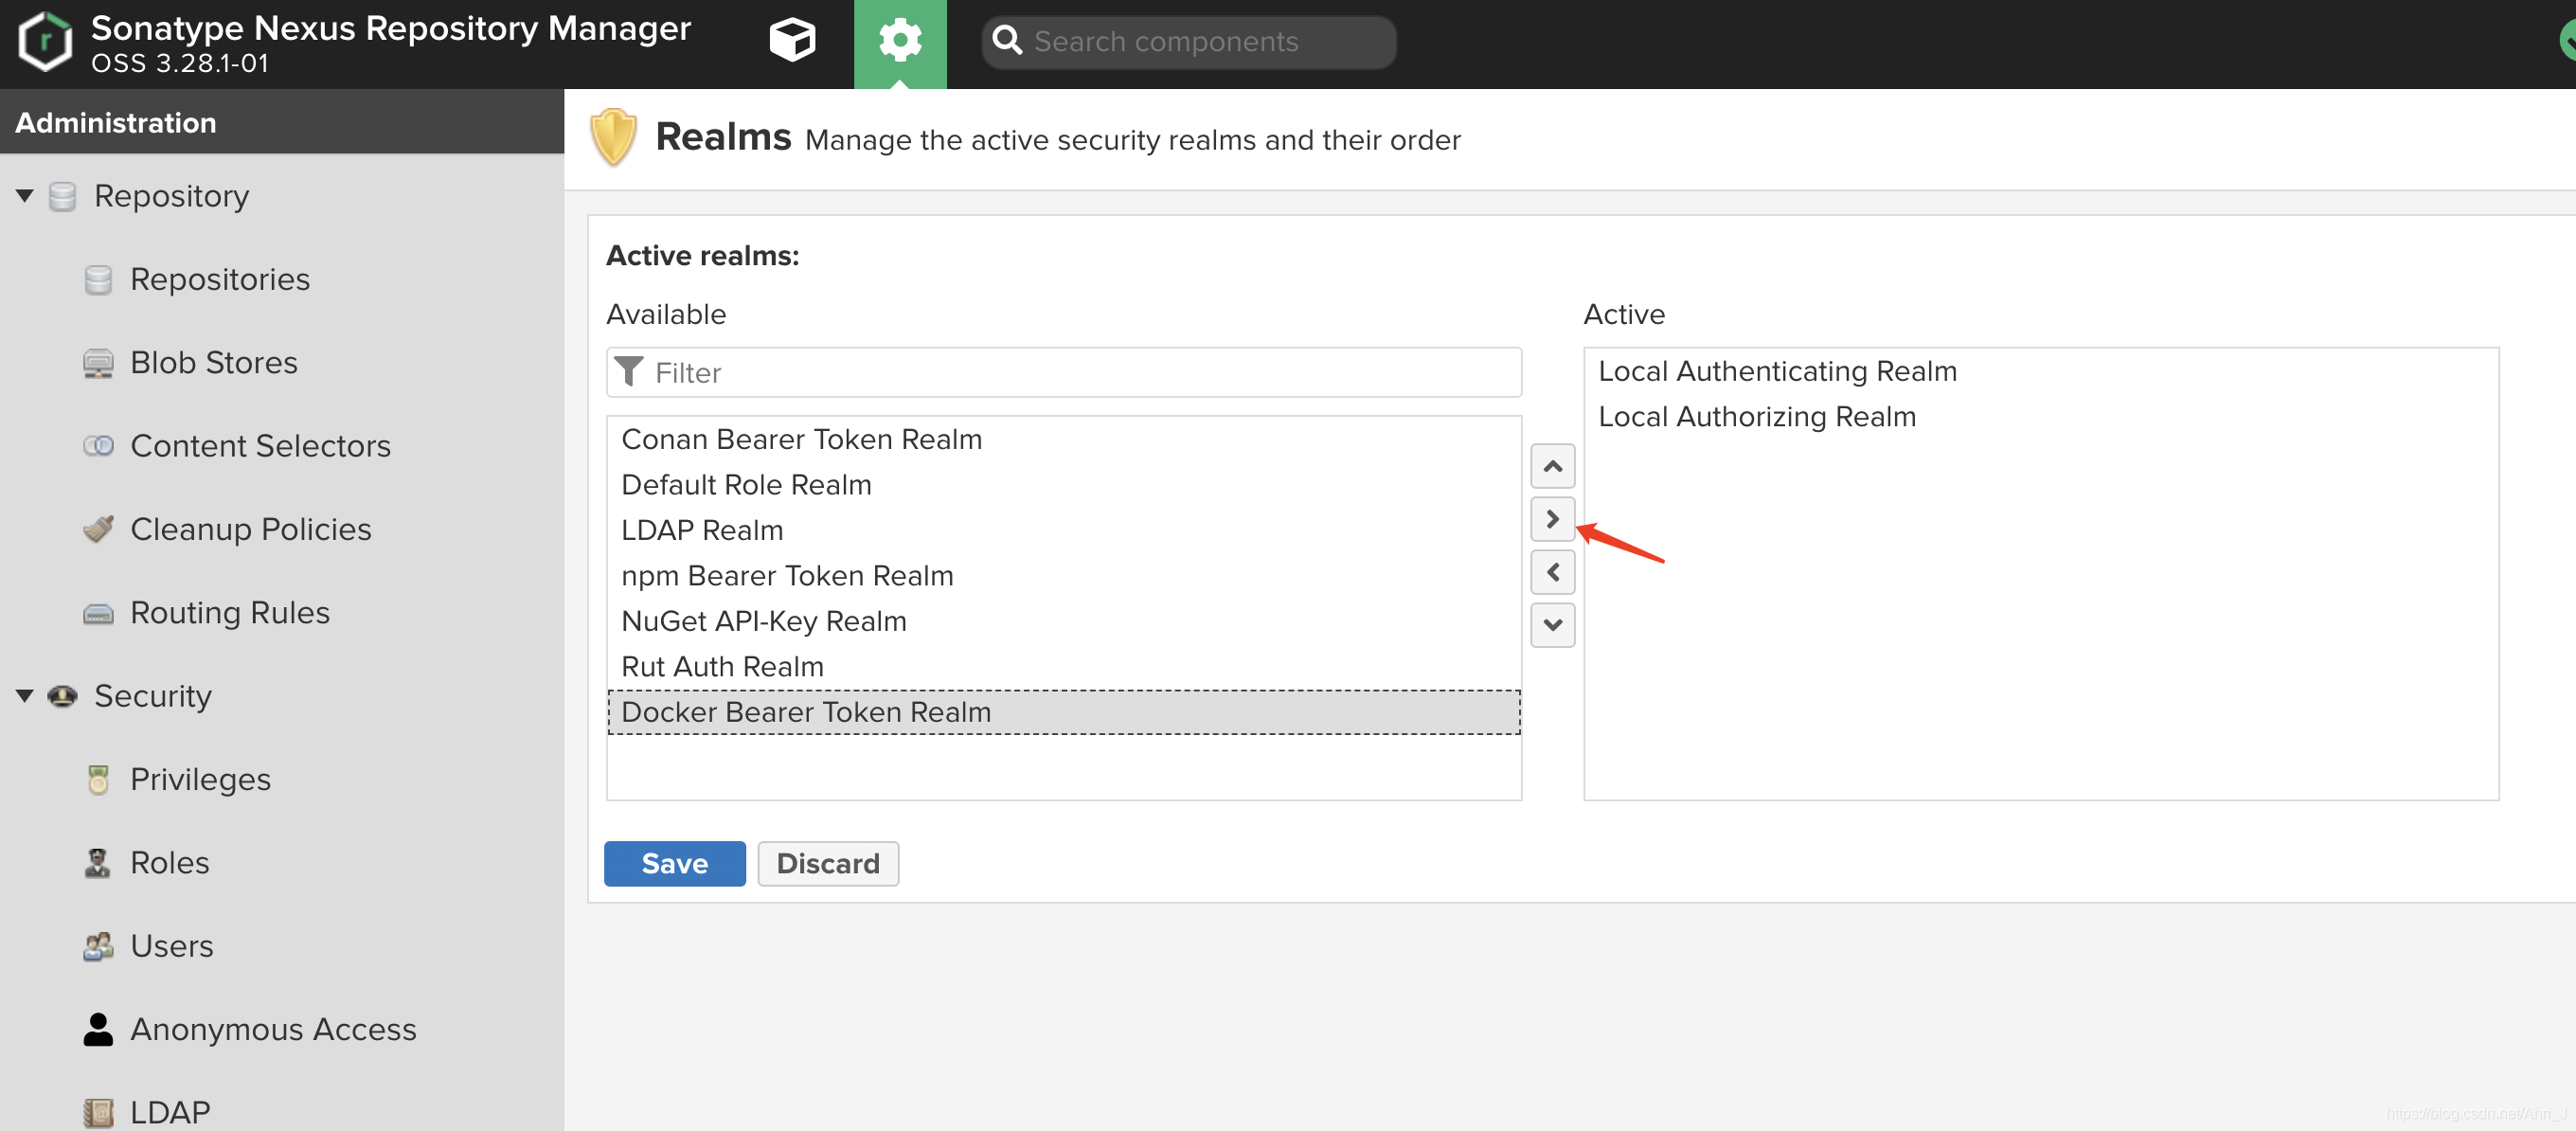
创建完成后我们会发现无论登陆还是 pull/push 镜像都会报权限错误。


这是因为 Nexus 默认没有设置校验 Docker ,可以修改下面配置将 Docker Bearer Token Realm 激活。
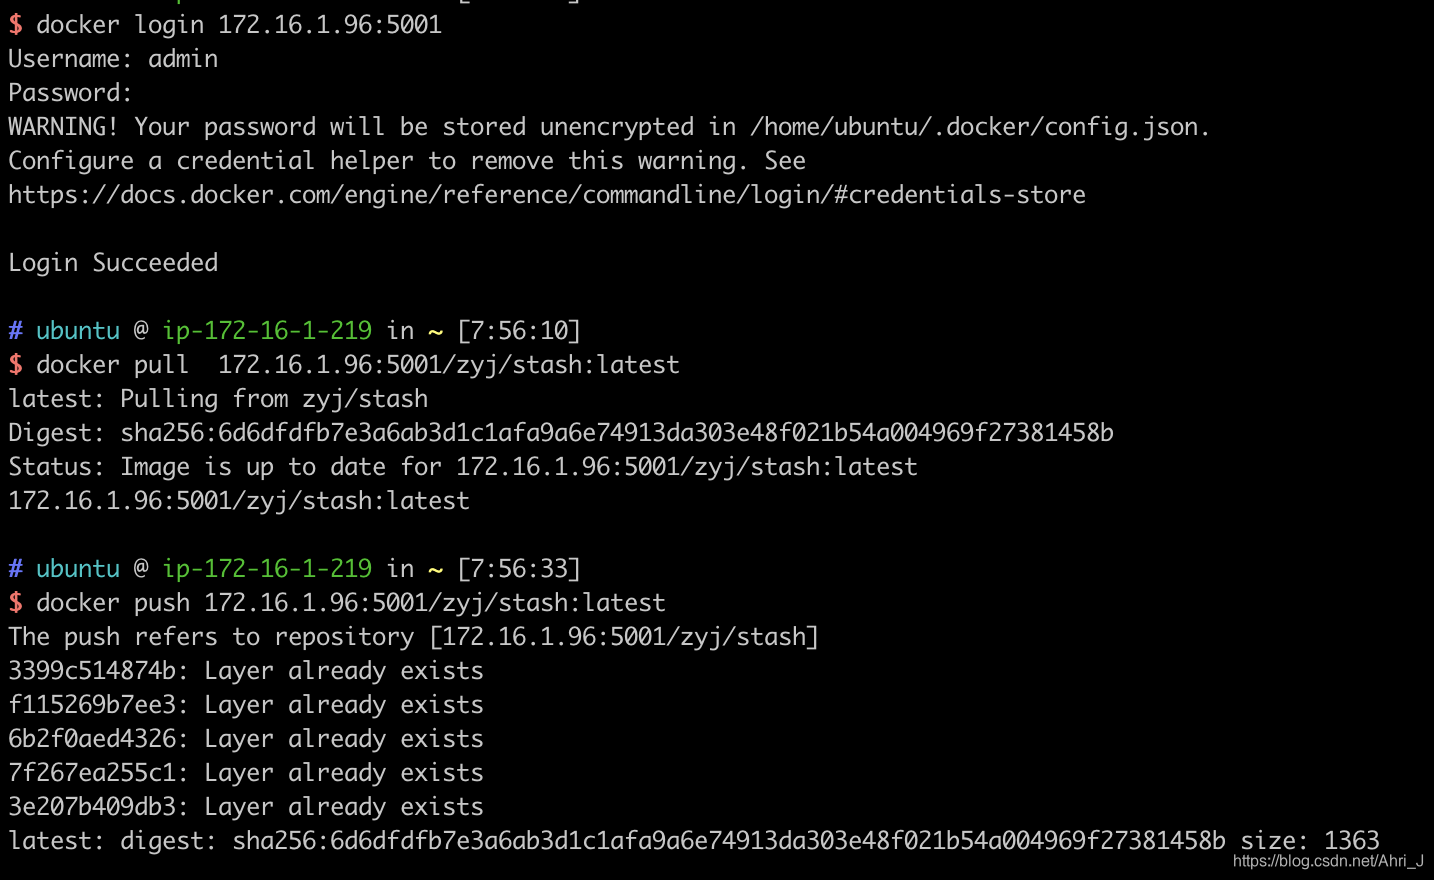
 然后后就可以正常登陆并 push 镜像了啦
以上就是 Nexus 搭建 Maven、Docker 私服的简要介绍了,希望对需要的同学有用。